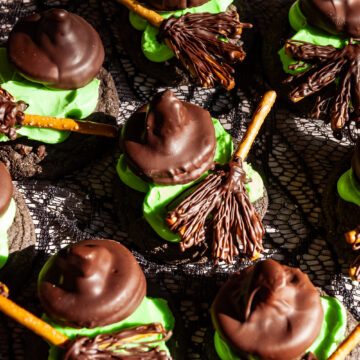
Melted Witch Cookies
Must be the season of the witch! These melted witch cookies boast a rich chocolate grain free cookie topped with a creamy dairy free frosting, and are decorated with a yummy witch "hat and broom" for a spooky fun treat! These charming cookies are such a fun way to celebrate the Halloween season! The grain free cookie base comes together easily and creates a deliciously chewy and rich chocolate flavor. The cookies are made using black cocoa powder to give them a dark and spooky look.
Ingredients
For the cookies:
- 110 grams dairy free butter
- 70 grams sugar
- 35 grams brown sugar
- 1 egg yolk
- 1 teaspoon vanilla extract
- 100 grams almond flour
- 70 grams tapioca flour
- 15 grams black cocoa powder
- ¾ teaspoon baking powder
- ¾ teaspoon xanthan gum
- ¼ teaspoon salt
- 85 grams dairy free chocolate
For the frosting:
- 150 grams dairy free butter
- 270 grams powdered sugar
- 1 teaspoon green food dye
For the witch brooms
- 20 pretzel sticks
- 4 oz dairy free chocolate
- 1 teaspoon coconut oil
For the witch hats
- 8 caramel candies
- 8 sandwich cookies
- 8 oz dairy free chocolate
- 2 teaspoon coconut oil
Instructions
- First, let's make the grain free chocolate cookies. Preheat your oven to 350. First, add the butter and both sugars to a bowl (or to a mixer if you would like, but keep it on low speed during the whole process) and begin to cream together the butter into the sugar until creamy.
- Next, add in the egg yolk and vanilla extract and mix well, again until creamy and smooth.
- Next, add in the flour, remaining dry ingredients, and mix until the dough comes together.
- Lastly, add in the chocolate chips and mix well.
- Line a cookie sheet with parchment paper. Using a big cookie scoop (3 tbsp), scoop out the dough and place on the cookie sheet, leaving a good amount of space in between each cookie. I do 5-6 at a time. Bake for 13-14 minutes, rotating your cookie sheet at the halfway point to ensure even baking for all of the cookies.
- While the cookies are baking, let's make the frosting. Add your butter to a bowl or mixer on low, and cream the butter until smooth.
- Add in the powdered sugar and cream together until the frosting is smooth.
- Add in green gel food dye and mix well. Set in the fridge until ready to use.
- Now let's make the cute witch decor. For the brooms, use a pretzel stick for the stick of the broom, and break up 2-3 pretzel sticks into smaller pieces and arrange them at the bottom to create a bristle look.
- In a microwave safe bowl, add 4 oz of chocolate with a teaspoon of coconut oil. Melt in 20 second intervals, stirring in between, until the chocolate is completely melted and smooth.
- Add the chocolate to a piping bag fitted with the smallest possible round tip. Or, add to a ziplock bag and use a scissor to cut a very tiny hole in one of the bottom corners. Drizzle on the chocolate to the end of the broom sticks until the bristles are covered. Place in the freezer for a few minutes until firm, then add a second coat of chocolate. Drizzling 2 coats of the chocolate creates a more textured, bristle look. Place in the freezer or refrigerator until ready to assemble.
- To make the hats, mold a caramel candy into the shape of the point of the witches hat. Using a bit of the left over chocolate from the "broomstick" chocolate, in the middle of a sandwich cookie add a dot of chocolate, then firmly press the caramel candy. The dollop of chocolate will freeze the caramel candy in place, making it easier to coat in chocolate later. Place in the freezer for a couple of minutes until the caramel candy has adhered to the sandwich cookie.
- In a microwave safe bowl, melt down 8 oz of chocolate with 2 teaspoon of coconut oil.
- Place witch hat into the bowl and cover completely with chocolate. Using a fork, lift the hat out of the chocolate and gently shake to remove excess chocolate. Once all the hats are coated, place in the freezer to firm up completely.
- Lastly, let's assemble! Pipe on a generous amount of the green frosting to each cookie in a melted puddle design. Add on one broomstick and a hat to each cookie. Enjoy!
- These cookies should be kept in the fridge and they remain delicious for several days.